It's been a little over 2 years since my last LA workshop. So many of you have been demanding that I teach a class locally. I am excited to be doing this again. I will be teaching the Art of Beauty a hands on workshop that is a fusion of Makeup and face painting techniques.
In the first part of the day I will guide you through the
different mediums and tools it takes to create masterful beauty and face
painting designs.
During the second portion of this workshop you will learn
how to use those multi-media products and create beautiful, photo ready,
seamless designs.
In the last portion of this workshop you will learn how to
breakdown your designs to be used for different events.
After the class is finished there will be an opportunity to
have your designs photographed and used for your own media and print.
Date: Feb, 8th, 2015
City: Los Angeles, CA
Location: TBA
Cost: $125
What to Bring: Your face painting kit, a small makeup kit, a
notepad and pen, a camera or cellphone camera, a model if you choose to (cannot
be another face painter or makeup artist) or a practice head.
Booking fee required to hold your place in this workshop:
$25
Booking is on a first come first serve basis. Workshop is
limited to 10 Students. Booking fee is non-refundable.
Please send $25 via PayPal to shawnadmakeup@yahoo.com
Remainder of your tuition is due no later than February 1st,
2015.
Cash is only accepted via cashiers check or money order.
Please call or email me to set that up.
This Christmas I have created a few new face painting and Makeup designs to share with you. I like to create a design then, do different versions of it. Maybe one for women and girls, one for Men and Boys and a fast version of all of them. It's always great to have some quick ones in your back pocket for the faster paced gigs. Some of these were designs I wore to my gigs and other's were painted on my clients. I was just lucky enough to capture a few of the designs I painted to share with you here.
Anyway I hope you are able to draw inspiration from these to create your own Christmas Face Painting designs. I Hope you are blessed this Christmas season and have a great Christmas Day with your family and friends.
One of the questions I get asked over and over again is "What products do you recommend for someone just starting out?" Wow, That is a loaded question. I love so many different products for so many reasons but, If I think back to when I was just starting out as a face painter I really didn't need much to get the job done. In this article I'm going to break it down to you bare bones style.
The first thing you need to know is this- Professional cosmetic grade face paint is what you will need to purchase. Not Acrylic paints found in an art store or craft store. Although they say Non-Toxic that does not mean they are safe or even made to be used on the skin.
Cosmetic face paints are actually water activated "Makeup" Yes you read that right it's Makeup. Didn't think you were going to become a Makeup artist did you? That's a whole different article so let's let that sit in for a while and we'll come back to that at a later date.
Back to getting started as a face painter. What do I need?
1. Cosmetic water based face paints- I recommend starting with a small palette that has Primary colors in it so you can learn to blend colors also, pink and purple so you can create some pretty butterflies and princesses. Below is a kit from Cameleon. It has just about every color you could want and need to get started. It also is my top pick for Black and White for all of my linework. You can pick this up a JestPaint for about $65. If that is out of your budget you can pick up a smaller size palette with 6 primary colors for about $35. I would go for the larger one because you'll end up coming back to purchase the pastels and secondary colors.
I also recommend buying a "Split cake" which means it has more than one color in the pot and is used with sponges. These range in prices but average about $14. You should also pick up at least one "One Stroke Cake" which means you can pick up multiple colors on your flat brush. I recommend picking up colors to create a Rose princess crown and butterfly and colors that create nice leaves which can also be used for various animals like snakes, turtles etc. These will average around $13
If you feel like doing it yourself I have created a tutorial on how to make your own split cakes but, that may be a little further down the line once you are more comfortable with color combinations.
2. Next is sponges. My favorite sponges for rainbow cakes are the pink sponges from Always Wicked Art.
These are called High Density Sponges meaning they hold up really nicely while delivering just the right amount of color evenly. You can pick these up for about $1 per half sponge.
My favorite sponges for single color blending are Hydra Sponges. They are typically about $.85-$1.00 per spnge. You will need to cut these in half unless they come pre-cut for you. You can purchase these at www.jestpaint.com
3. Brushes- I find many of my brushes in the art store but, you can also purchase a collection like these from Cameleon if you like a more streamlined look in your kit. I like flat brushes in sizes 1 in, 3/4 in and 1/2 in for one stroke and split cakes, round brushes in size #1, #3, #6 and a #10 filbert.
4. Most importantly you will need GLITTER. What is face painting without the magical part of it? I recommend Sugar Face and Body Art glitters. They are glitters designed and chosen by artists. Tried and tested.
The important thing to remember is to ALWAYS make sure you are choosing a "COSMETIC" glitter which just means it's poly or made from plastic not aluminum which can scratch the cornea if it gets in the eye.
I personally prefer Azucar by Sugar Face and body Art which is a holographic white glitter. It can be used over any color and looks sparkly and magical!
5. Extras- It's always important to have some makeup wipes on hand to clean up little mess ups, a small water bottle to mist your sponge or cake to activate the paint, 2 cups for water. 1 for clear water, 1 for cleaning off your brush. I like to use Brush Bath from sillyfarm in my colored water cups to really remove the paint and help keep my brushes clean, a black towel to lay down on your table before you set up, a mirror and some antibacterial hand sanitizer to use in between clients.
I personally think this is just enough to get you started and on your way to becoming a professional face painter. If you still need help with setting up your kit I have a video for that and I also have created a few face painting tutorials to help get you on your way.
You can watch my videos below:
I hope you found this helpful. Again this is just for beginners who are interested in finding out what pro products they should purchase to get started. If you are an intermediate to advanced artist this may be a nice idea for an emergency face painting kit or travel size face painting kit.
Do you have a niche in the makeup or face paint world? Do ever think where do I fit in? What is my specialty? I know I did when I first started painting. I found myself naturally leaning to painting Creative single eye designs. I believe it started because I would paint my own face before I would go out on a gig.
I personally didn't want a full face meltdown half way through my day so, I would paint a design based off of my eyeshadow color and/or theme of the party or event I was going to be at. My goal is always to blend the design to create a beautiful seamless looking Creative eye design.
I found myself painting more moms and women at parties as well. Most women don't want a face full of face paint either. They always seem to ask for something small. My answer to that was to create something around the eye in a "C" shape mostly. Sometimes that shape would start at the forehead and come down in more of a "V" shape.
I usually need some sort of inspiration when painting someone. It may be the clothes they are wearing, the eyeshadow they have on or the theme of the event. I have even found myself painting designs like this for little boys and girls. Most parents appreciate it and kids are always impressed with the detail. Of course, there is always a time and place for a full face design but, I just naturally lean towards Creative Single Eye designs.
Whether I am using the One Stroke method, rainbow cakes or airbrushing I always lean toward creating these "Creative single eye designs" as I like to call them. They are fun and sometimes challenging which I personally love because I feel it makes me grow as an artist.
I have put together a collection of some of my designs for inspiration. I have posted these over the course of the last year and a half so most of them are fairly recent. I hope you are inspired to get creative and create some of your own Creative Single Eye Designs too. I would love to see them. Feel free to share them with me here or on my facebook page.
Finding your niche is easy just go through the photos you post and look to see what you tend to do over and over again. What do people love that you do? That is your niche. Try not to be anyone else. Sure, copying is how we learn but, find out who you are and be the best you you can be.
It's that special time of year again. That time when everything sparkles and shines and one of the most beautiful things happens with some of my favorite cosmetic lines. They do this magical thing just for me (well, maybe not just for me). They put together awesome kits and sets of typically their best selling products and usually in smaller sizes. Do you even know what that means to me? It means I can add multiple products in small sizes to my KIT!!!! AHHHH I'm screaming inside. I am a minimalist at heart, I hate big bulking packaging and even more I hate have to depot products into smaller containers so, this is EVERYTHING to my minimalist heart.
I could really go broke during the holidays simply re-stocking my kit but, most of these products last at least til the next year for me at least.
Here are a few of my picks and some I look forward to buying every year.....
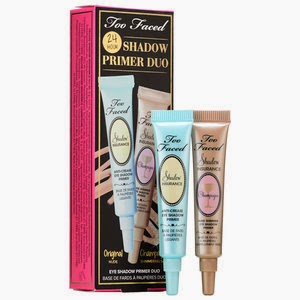
I have personally been wearing the heck out of this melted kisses set. I bought mine early. I'm not sure if it is still available right now. If not get the regular size in Nude. It's amazeballs!
This is another personal favorite. The Laura Geller Baked Starter set. I love to carry the small sized blush and powder foundation in my own purse. It's a great way to try the colors in her line as well. I really enjoy Laura Gellers products. They are beautiful. Laura please come out with a pro discount so I can buy more for my kit! I love that her mineral products are pressed. big bonus for makeup that travels a lot.
These double ended eyeliners from Urban Decay are perfect for trying to keep a condensed kit.
These Bronzers from Too Faced are so gorgeous and what better way to add them to your kit than in these small sizes.
The only thing you can't find for your kit is foundations and concealers. That is something you'll just have to buy in larger sizes and decant or depot. You can even find skincare in smaller sizes but typically they are for a specific skin type. I personally keep Josie Maran Argan oil in the original and in light in my kit and it works on all of my clients.
What are your favorite Makeup kit products? Share the wealth below or on my facebook page.
I'm so excited and honored to be asked to represent Pro Aiir at IMATS LA in Pasadena on January 16th-18th. If you have never been to IMATS and you are in the face and body Art industry you need to go. This is a great event with amazing instructors and classes and a wonderful selection of vendors.
I will be there this year at booth # 613 with Pro Aiir. I will be doing some small demos showing Diips and Dazzle Diips brush on waterproof makeup with owner and creator of Pro Aiir Hybrid Makeup Donna Nowak and Skin Wars Star Dutch Bihary. Dutch will be sharing some of his master body painting skills.
If you have yet to purchase your ticket go to http://www.imats.net/ Saturday is currently sold out but, tickets for Sunday are still available.
I can't wait to meet you all and visit with all of my amazingly talented friends.
See you there!
A couple of days ago I posted a pic of a little arm art design I painted for a guest at an event I was working at. She asked for the character Stitch of Lilo and Stitch. After I posted it on facebook someone asked for a step by step for her 3 year old son who absolutely loves Stitch and carries around his little stuffed toy everywhere he goes. how could I say no to that.
This is what I came up with for her and for all of you. I hope you are able to use it at a party or event too.
Happy Painting my friends.
I know it's been a while since my last Youtube makeup tutorial but, I've been a busy gal. This year has been such a year of Growth for me personally and for my business. I am currently on what I consider my vacation time so I hope to put out more tutorials during this slower season.
In this tutorial I will show you how to use Pro Aiir hybrid Makeup and Diips Brush on Makeup to create a stunning long wearing Butterfly design. This is great for clients who will be in their makeup for an extended period of time or for those who perspire a lot.
I used the Following products-
Pro Aiir Hybrid Makeup- White, teal and Black
Pro Aiir Dazzle Diips- Bronze
Pro Aiir Diips- Black
Ben Nye Lumier Pallet
My Face Makeup - Mehron Celebre Pro Med 3 and 4, Mac Mineral Skin Finish Med. Plus, Bronzer Maybelline, Blush La femme
Lipstick- Too Faced Melted Nude Lipstick, Bare Minerals Natural Lip liner, Miss Adoro Diablo Lipgloss.
Brushes- Loew Cornell 700c series #3 round and Loew Cornell Goldgrip #1 Script liner
Airbrush- Dinair


.jpg)

.jpg)